Code Reading Odoo’s Sales Module Using Code2Flow
Odoo’s Sales module is a powerful component in its ERP system, handling complex workflows for order processing, customer management, and inventory updates. However, due to the sheer size and interconnected nature of its codebase, understanding this module can be challenging. Here, we’ll explore how to use Code2Flow to visualize the call structure and workflows, making it easier to grasp the code’s functionality and flow.
Why Use Code2Flow for Odoo?
Odoo’s modular design allows developers to customize and extend features across multiple layers, like models, views, and controllers. By using Code2Flow, we can convert these complex relationships into simple, understandable flowcharts that provide a roadmap of function calls and logic. This is especially helpful for:
- Navigating Model Relationships: Tracking how different models interact (e.g.,
sale.order,res.partner). - Following Method Calls: Visualizing function calls and inheritance structures.
- Mapping Workflow Logic: Understanding the main steps in a process, like order creation, confirmation, and delivery.
Setting Up Code2Flow
-
Install Code2Flow: Ensure you have
code2flowinstalled. You can install it via pip:pip install code2flow -
Setup Graphviz (Optional): Code2Flow uses Graphviz for rendering flowcharts. Install it with:
sudo apt install graphviz
Step-by-Step: Reading Odoo’s Sales Module
Let’s dive into the main components of the Odoo Sales module and use Code2Flow to map out the structure and relationships.
Step 1: Analyze the Sales Module’s Key Files
Navigate to the addons/sale/ directory in the Odoo source code, where you’ll find core files:
models/sale_order.py: Contains core business logic forsale.order(sales orders).views/sale_order_view.xml: XML file that defines the user interface for sales orders.controllers/portal.py: Contains controller methods for web interactions.
Each file plays a specific role, and understanding how these roles connect is essential for an overview of the module.
Step 2: Visualize Model Relationships with Code2Flow
Start by focusing on models/sale_order.py, the file that defines sale.order and sale.order.line. Code2Flow helps generate flowcharts for understanding relationships between methods and identifying entry points.
Example: Generating a Flowchart for sale_order.py
Run Code2Flow on sale_order.py:
code2flow models/sale_order.py -o sale_order_flowchart.png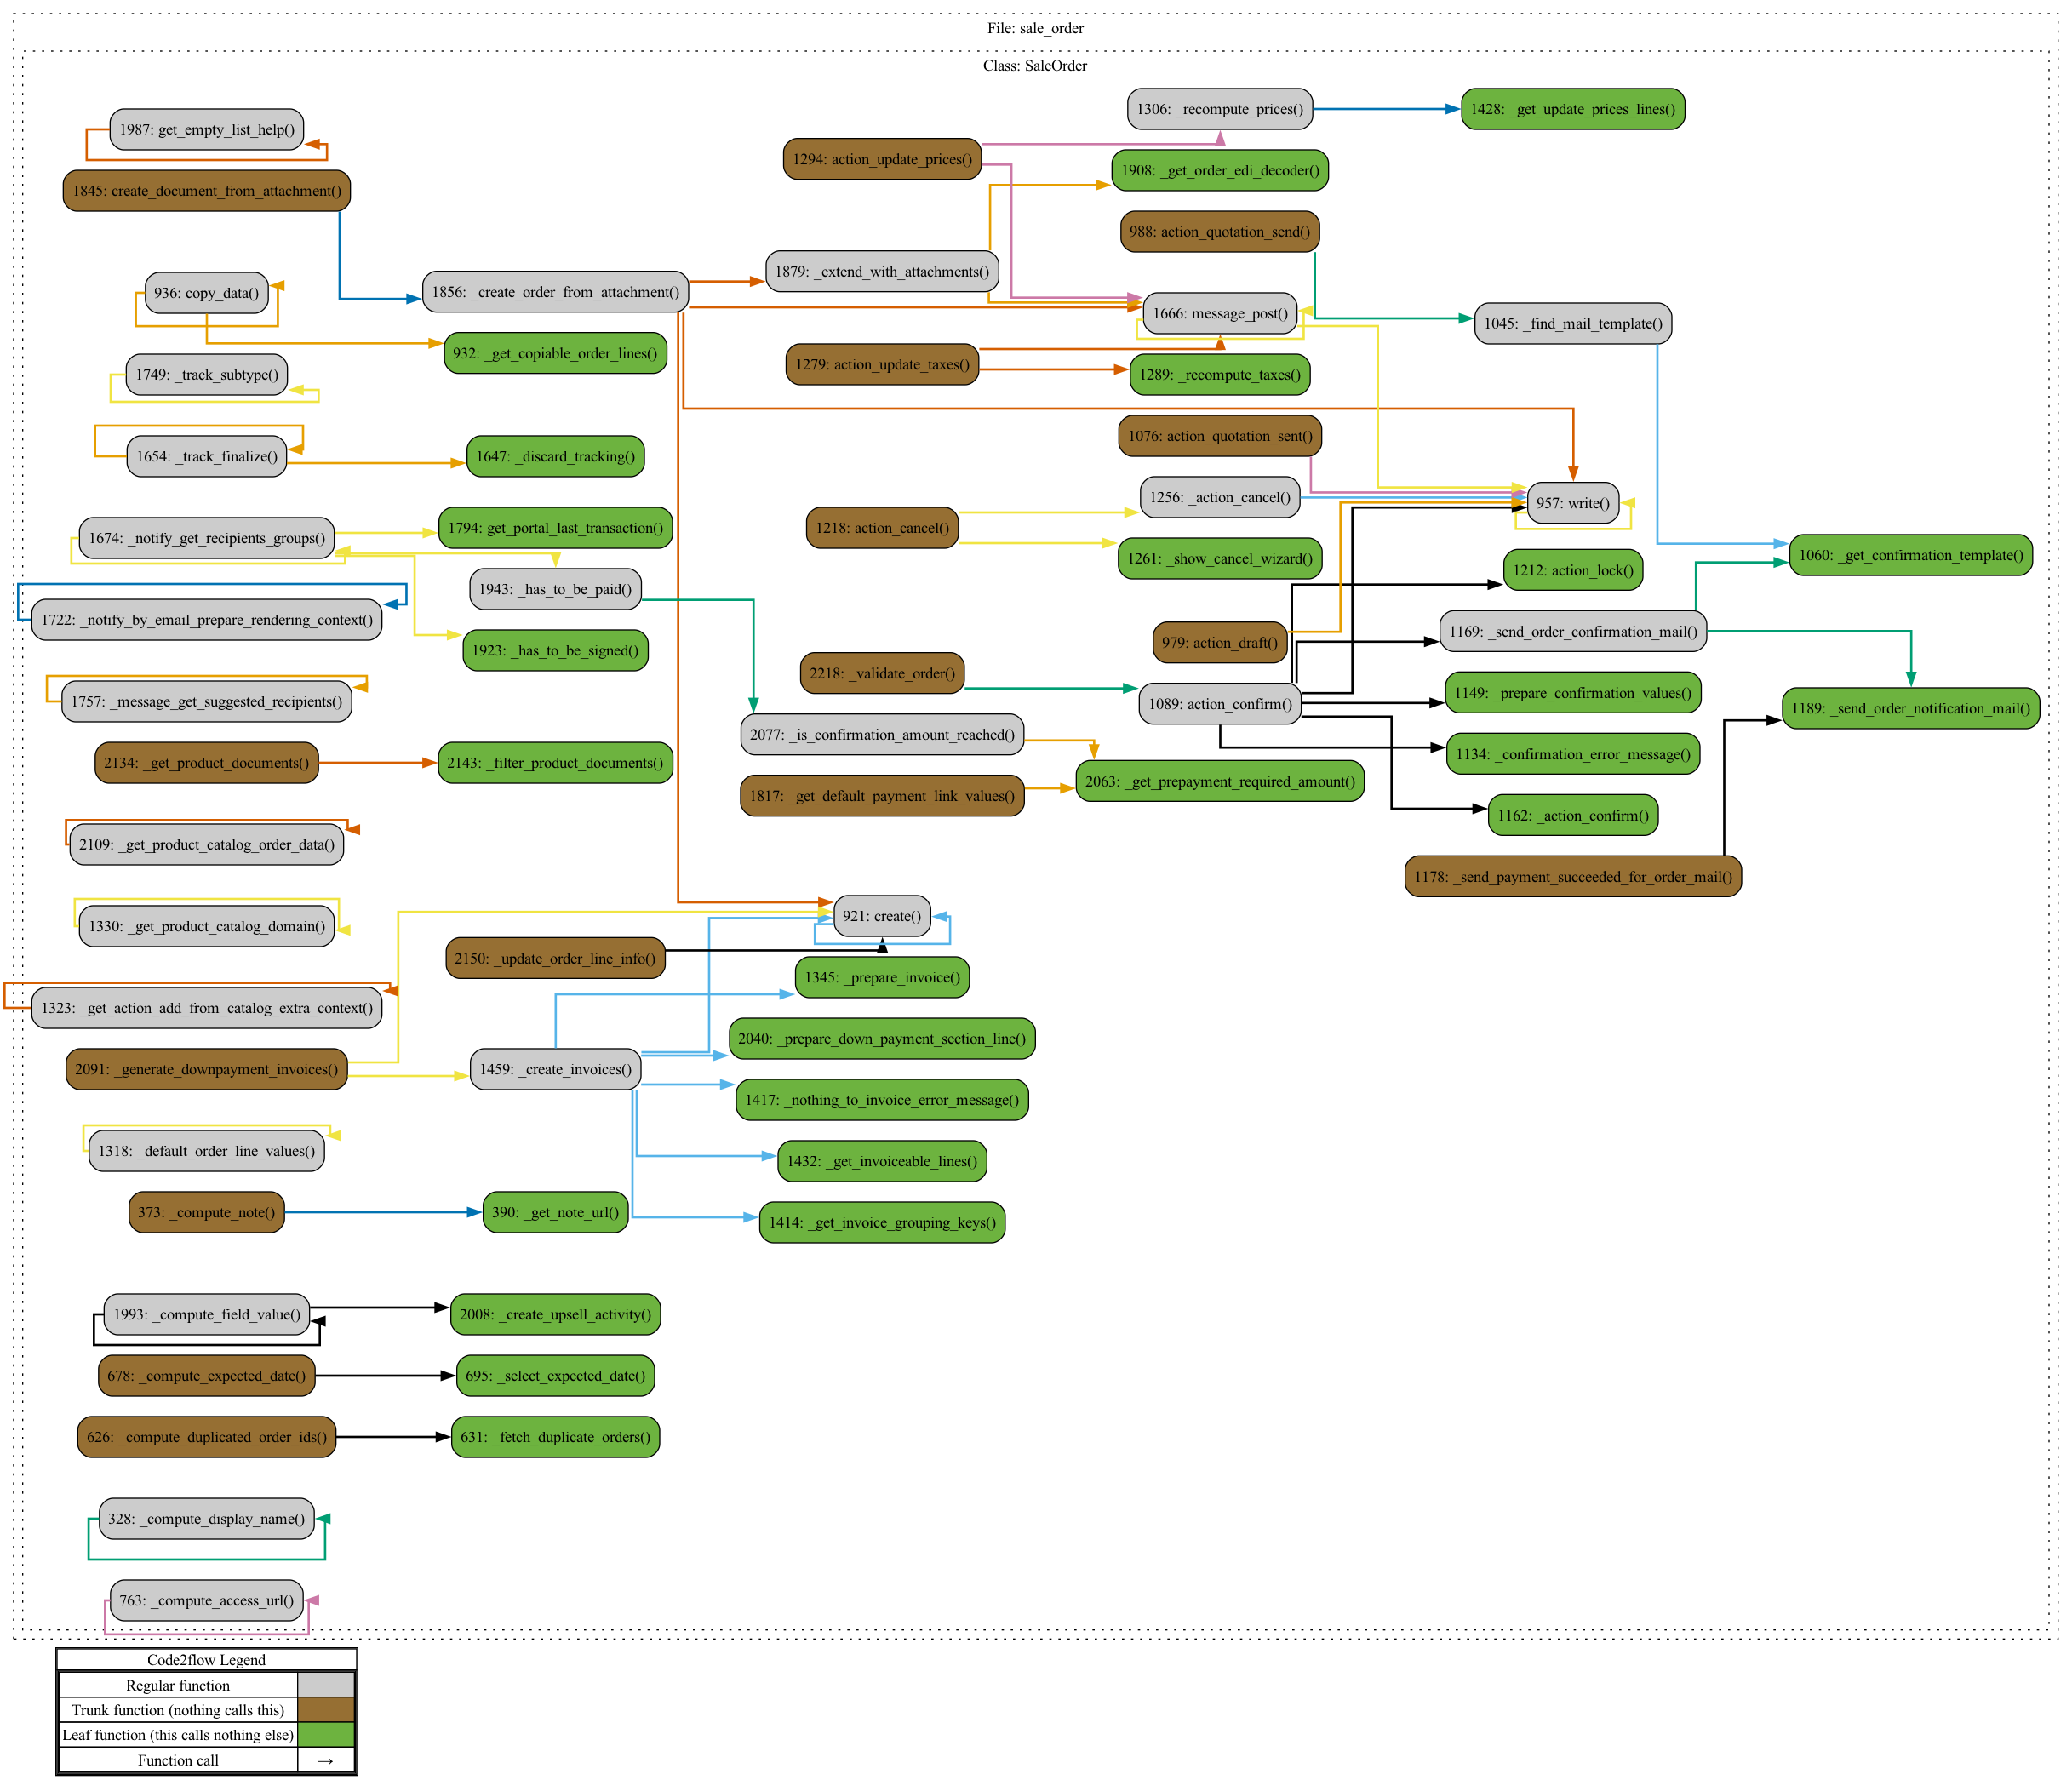
The output image, sale_order_flowchart.png, will reveal:
- Model Methods: Methods like
create,write, andaction_confirm, which define order creation and confirmation logic. - Inheritance and Call Flow: Code2Flow will show how
sale.orderinteracts with inherited methods frommodels.Model.
Key Methods to Observe
create: Custom logic for setting up a new sales order, assigning a unique reference, and adding order lines.action_confirm: Defines the steps involved in confirming a sale, including inventory updates and customer notifications.
Step 3: Visualize Controller Interactions
The controllers/portal.py file defines endpoints that customers use to view orders in the portal. By running Code2Flow on this file, you’ll see how requests move through different parts of the Odoo system.
code2flow controllers/portal.py -o portal_flowchart.png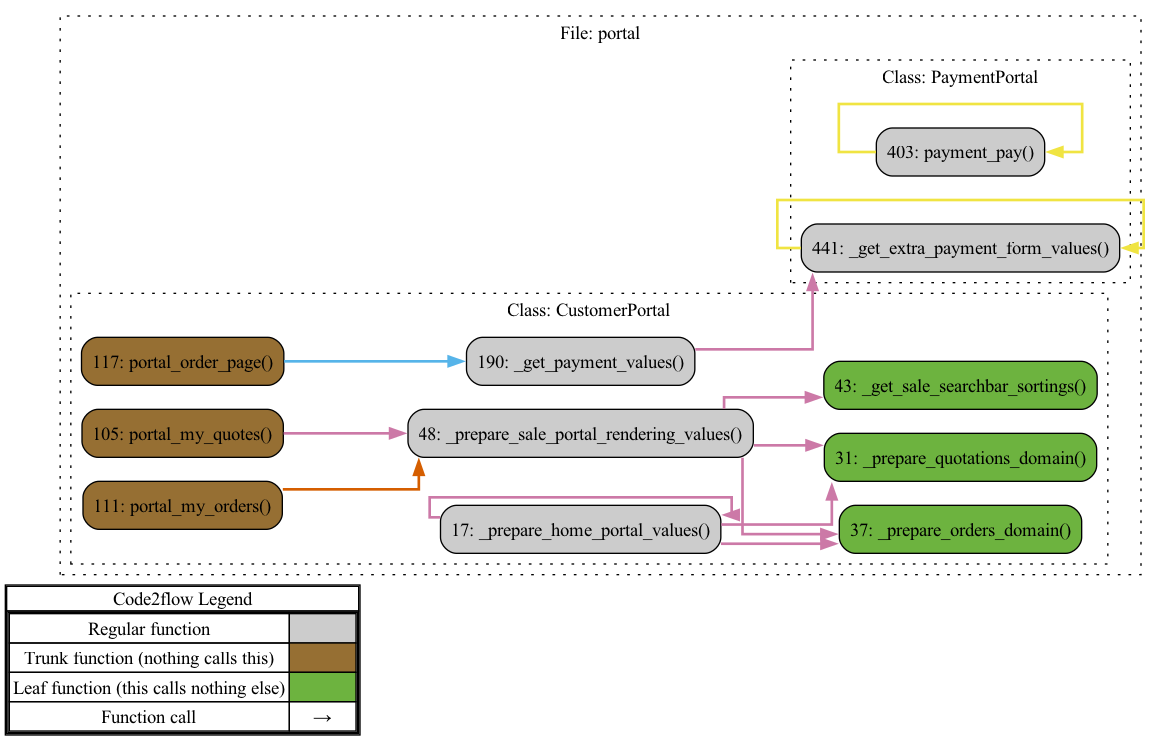
This generates a flowchart showing:
- Route Mappings: Routes defined by decorators like
@http.route, specifying how requests are handled. - Method Calls: Code2Flow highlights which methods are called when accessing endpoints like
/my/orders.
Observing Portal Logic
- Customer Order Access: Methods like
my_ordersretrieve and render sales orders for logged-in users. - Template Rendering: See how the controller calls specific templates for rendering, connecting frontend views to backend logic.
Step 4: Map Out the Workflow for Order Creation and Confirmation
With sale_order.py and portal.py flowcharts created, you can now map a comprehensive workflow for key operations, like creating and confirming a sales order.
Combined Code2Flow Example
To map the full workflow of creating and confirming an order, combine files for a single flowchart:
code2flow models/sale_order.py controllers/portal.py -o full_sales_workflow.png
This will reveal:
- Step-by-Step Process: Starting from the customer action on the portal, you’ll see how the request flows into the
sale.ordermodel. - Data Processing and Business Logic: Methods are linked to their processing steps, showing how data is validated, stored, and passed through each function.
- Error Handling and Conditional Logic: Code2Flow’s flowchart shows decision points in the process, which is useful for debugging or extending functionality.
Step 5: Refine and Annotate the Flowcharts
The generated flowcharts give you a visual representation, but adding annotations can further enhance clarity:
- Label Key Methods and Relationships: Use tools like an image editor to label important functions and relationships in the flowchart.
- Document Entry and Exit Points: Highlight where processes start and end, making it easier to identify workflow boundaries.
Step 6: Iterate and Explore More Modules
After understanding the Sales module with Code2Flow, continue with related modules, like account or stock, to see how they integrate. This iterative approach will help you map out the broader Odoo ERP system.
Conclusion
Using Code2Flow to visualize Odoo’s Sales module breaks down its complex structure into manageable parts. This approach is invaluable for:
- Understanding Relationships: See how models, views, and controllers connect within the Sales module.
- Streamlining Development: Quickly identify parts of the code you need to modify or extend.
- Debugging and Optimization: Follow data and function flow to locate bottlenecks or potential errors.
By systematically applying Code2Flow to various Odoo modules, you can better navigate the codebase, speeding up your learning curve and making customization easier. Try applying these steps to other modules to get a comprehensive understanding of Odoo’s functionality.
Using this method allows developers to better understand Odoo’s modules visually, simplifying their navigation and fostering a quicker learning experience.
Get in Touch with us

Chat with Us on LINE
iiitum1984
Related Posts
- LlamaIndex + pgvector: Production RAG for Thai and Japanese Business Documents
- simpliShop:专为泰国市场打造的按需定制多语言电商平台
- simpliShop: The Thai E-Commerce Platform for Made-to-Order and Multi-Language Stores
- ERP项目为何失败(以及如何让你的项目成功)
- Why ERP Projects Fail (And How to Make Yours Succeed)
- Payment API幂等性设计:用Stripe、支付宝、微信支付和2C2P防止重复扣款
- Idempotency in Payment APIs: Prevent Double Charges with Stripe, Omise, and 2C2P
- Agentic AI in SOC Workflows: Beyond Playbooks, Into Autonomous Defense (2026 Guide)
- 从零构建SOC:Wazuh + IRIS-web 真实项目实战报告
- Building a SOC from Scratch: A Real-World Wazuh + IRIS-web Field Report
- 中国品牌出海东南亚:支付、物流与ERP全链路集成技术方案
- 再生资源工厂管理系统:中国回收企业如何在不知不觉中蒙受损失
- 如何将电商平台与ERP系统打通:实战指南(2026年版)
- AI 编程助手到底在用哪些工具?(Claude Code、Codex CLI、Aider 深度解析)
- 使用 Wazuh + 开源工具构建轻量级 SOC:实战指南(2026年版)
- 能源管理软件的ROI:企业电费真的能降低15–40%吗?
- The ROI of Smart Energy: How Software Is Cutting Costs for Forward-Thinking Businesses
- How to Build a Lightweight SOC Using Wazuh + Open Source
- How to Connect Your Ecommerce Store to Your ERP: A Practical Guide (2026)
- What Tools Do AI Coding Assistants Actually Use? (Claude Code, Codex CLI, Aider)