Integrating AR-based 3D product previews into an eCommerce mobile app can significantly enhance the shopping experience, allowing users to visualize products in real-world environments before purchasing. Here’s a breakdown of how to incorporate AR into your eCommerce mobile app using Three.js and JSARToolkit:
1. Purpose and Benefits of AR Product Previews in eCommerce
- Enhanced Customer Experience: AR previews provide an immersive, interactive way for customers to “try before they buy,” making products more tangible and reducing uncertainty.
- Increased Engagement and Conversion Rates: Visualizing a product in their space or on themselves makes users more likely to purchase, often increasing engagement and conversion rates.
2. Library Requirements
- Three.js: For rendering and animating 3D product models within the app.
- JSARToolkit: For marker-based AR functionality, allowing users to visualize products by pointing their camera at a predefined marker.
- THREEx.AR: A helper library that simplifies integrating Three.js with JSARToolkit, providing ready-to-use functions for setting up AR contexts and markers.
3. Setting Up the AR Space in Your App
- Scene Initialization: Use Three.js to create the 3D scene where your product models will be rendered.
- Camera and Renderer Setup: Set up the camera view to render AR elements over real-world objects. Integrate the renderer to draw the AR objects onto the app screen.
-
Lighting and Effects: Add ambient and point lights to illuminate products, enhancing the realism of the AR experience.
var scene, camera, renderer;
scene = new THREE.Scene();
camera = new THREE.Camera();
renderer = new THREE.WebGLRenderer({ antialias: true, alpha: true });
renderer.setSize(window.innerWidth, window.innerHeight);
document.body.appendChild(renderer.domElement);
4. Integrating AR Marker Detection for Product Visualization
- Marker Source Setup: Initialize
arToolkitSourceto pull video input from the device camera. This enables real-time marker detection, so AR elements appear on or around physical markers. -
Marker Context: Set up
arToolkitContextto process marker data and integrate it with the 3D product preview, ensuring correct alignment and scale.arToolkitSource = new THREEx.ArToolkitSource({ sourceType: 'webcam' }); arToolkitContext = new THREEx.ArToolkitContext({ cameraParametersUrl: 'data/camera_para.dat', detectionMode: 'mono' });
5. Placing 3D Models on the Marker
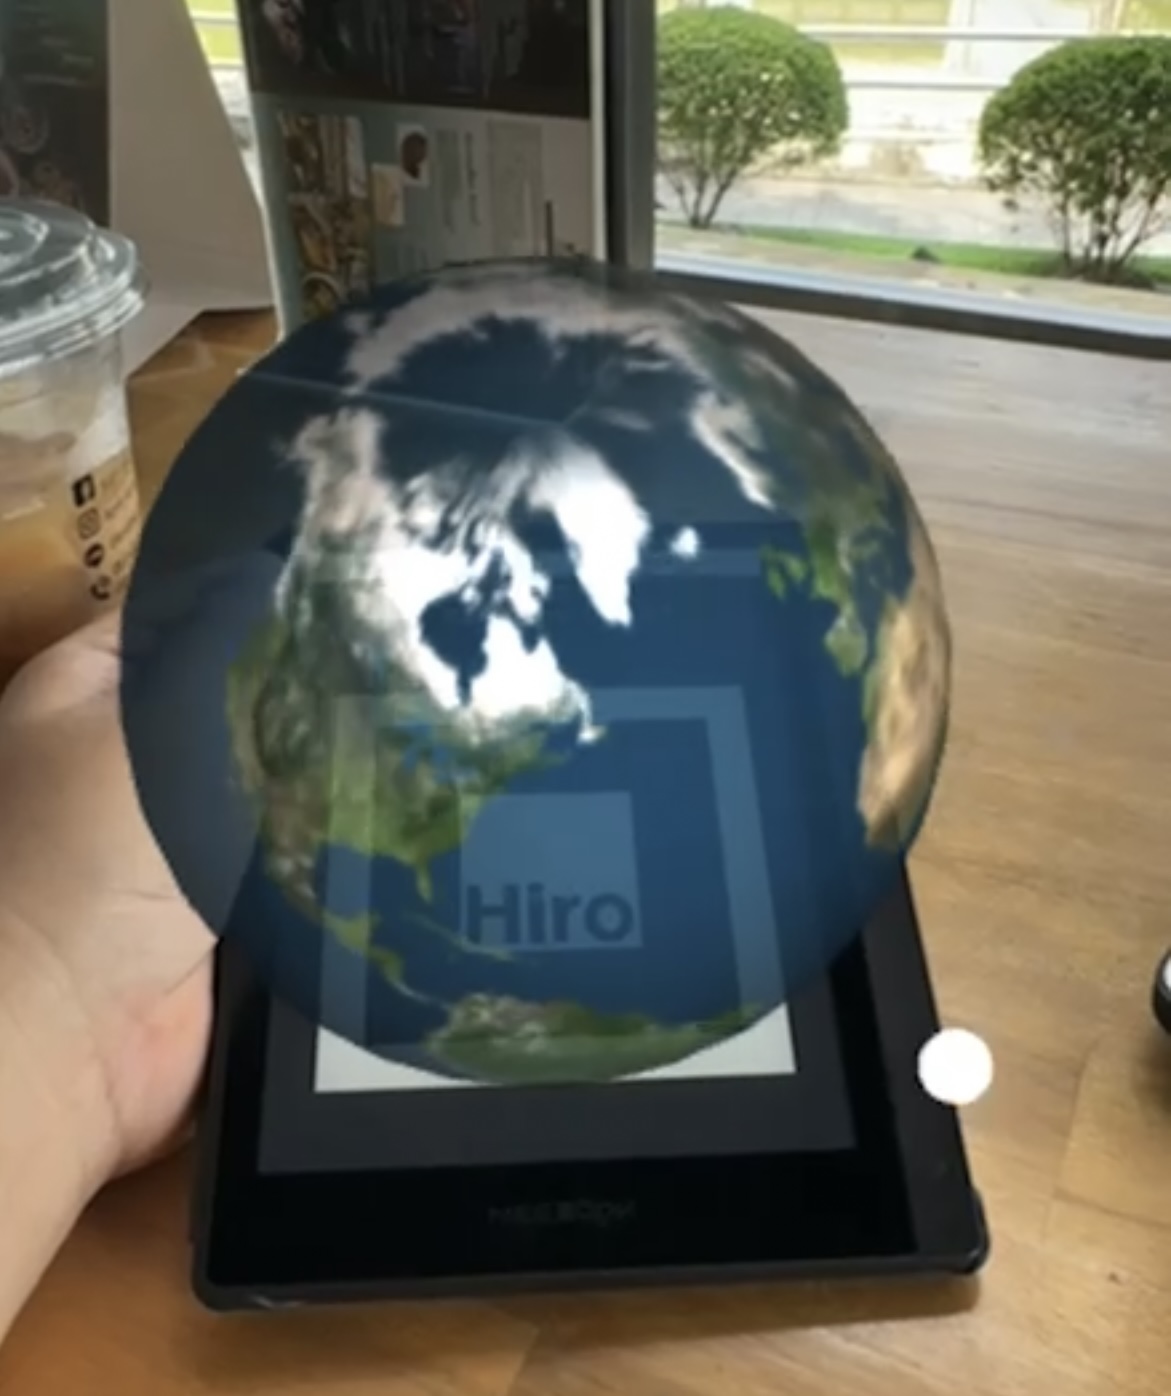
- Marker Initialization: Use a Hiro marker or custom marker to act as an anchor point. When the app detects the marker, it triggers the display of a 3D model, such as a product the user is interested in.
-
Loading Product Models: Load a product model (e.g., furniture, accessories) using a
TextureLoaderorGLTFLoaderin Three.js. Customize the model’s appearance with textures and adjust the scale based on the product’s real-life dimensions.let geometry = new THREE.SphereGeometry(1, 32, 32); let loader = new THREE.TextureLoader(); let texture = loader.load('images/product-texture.jpg'); let material = new THREE.MeshLambertMaterial({ map: texture }); let mesh = new THREE.Mesh(geometry, material); markerRoot.add(mesh);
6. User Interaction with AR Products
- Rotations and Scaling: Add interactive options to rotate, zoom, and scale products, helping users get a full view from various angles.
- Dynamic Marker Recognition: Enable dynamic marker detection for multiple products, allowing users to view various items by switching between markers (e.g., different product markers for each category).
- Customization Options: Let users change product colors or styles within the AR preview. For example, they can select different fabric colors or finishes for furniture.
7. Seamless AR Integration in the App Workflow
- Triggering AR Mode: Place an “AR Preview” button on each product page. When clicked, it switches to AR mode, activating the camera and starting the marker recognition process.
- Add to Cart from AR: Directly integrate the “Add to Cart” function within the AR preview so users can purchase items after visualizing them.
- Push Notifications for Special Offers: Use notifications to encourage users to try AR previews for items on sale or promote new arrivals with a unique AR experience.
8. Additional Tips for AR Optimization
- Optimize Model Quality: Keep the models lightweight to reduce load times while retaining enough detail for users to recognize product features.
- Lighting Adjustments: Make sure AR lighting matches real-world lighting for a more natural product appearance.
- Minimize Battery Usage: Reduce processing loads by unloading AR components when not in use to avoid excessive battery drain.
9. Testing and Deployment
- Test Across Devices: Ensure compatibility across Android and iOS devices, testing for performance and camera access permissions.
- User Guidance: Include a short tutorial for first-time users explaining how to use the AR features, find markers, and interact with products.
10. Real-World Benefits of AR in eCommerce
- Enhanced Product Understanding: By providing an accurate preview of products in their environment, users gain a better sense of the product’s look, size, and compatibility with their space.
- Reduced Return Rates: Visualizing products beforehand leads to higher satisfaction and lower return rates.
- Higher Sales Conversion: The AR preview’s immersive experience encourages users to make informed purchasing decisions, boosting conversions.
By integrating AR product previews into your eCommerce mobile app, you offer a unique, user-centered experience that not only sets your app apart but also creates a more interactive, satisfying shopping journey for customers.
full source code
<!DOCTYPE html>
<head>
    <meta name="viewport" content="width=device-width, user-scalable=no, minimum-scale=1.0, maximum-scale=1.0">
    <title>Hello, world!</title>
    <!-- include three.js library -->
    <script src='js/three.js'></script>
    <!-- include jsartookit -->
    <script src="jsartoolkit5/artoolkit.min.js"></script>
    <script src="jsartoolkit5/artoolkit.api.js"></script>
    <!-- include threex.artoolkit -->
    <script src="threex/threex-artoolkitsource.js"></script>
    <script src="threex/threex-artoolkitcontext.js"></script>
    <script src="threex/threex-arbasecontrols.js"></script>
    <script src="threex/threex-armarkercontrols.js"></script>
</head>

<body style='margin : 0px; overflow: hidden; font-family: Monospace;'>

<!--
  Example created by Lee Stemkoski: https://github.com/stemkoski
  Based on the AR.js library and examples created by Jerome Etienne: https://github.com/jeromeetienne/AR.js/
-->

<script>

var scene, camera, renderer, clock, deltaTime, totalTime;

var arToolkitSource, arToolkitContext;

var markerRoot1;

var mesh1;

initialize();
animate();

function initialize()
{
    scene = new THREE.Scene();

    let ambientLight = new THREE.AmbientLight( 0xcccccc, 0.5 );
    scene.add( ambientLight );

    camera = new THREE.Camera();
    scene.add(camera);

    renderer = new THREE.WebGLRenderer({
        antialias : true,
        alpha: true
    });
    renderer.setClearColor(new THREE.Color('lightgrey'), 0)
    renderer.setSize( 640, 480 );
    renderer.domElement.style.position = 'absolute'
    renderer.domElement.style.top = '0px'
    renderer.domElement.style.left = '0px'
    document.body.appendChild( renderer.domElement );

    clock = new THREE.Clock();
    deltaTime = 0;
    totalTime = 0;

    ////////////////////////////////////////////////////////////
    // setup arToolkitSource
    ////////////////////////////////////////////////////////////

    arToolkitSource = new THREEx.ArToolkitSource({
        sourceType : 'webcam',
    });

    function onResize()
    {
        arToolkitSource.onResize()
        arToolkitSource.copySizeTo(renderer.domElement)
        if ( arToolkitContext.arController !== null )
        {
            arToolkitSource.copySizeTo(arToolkitContext.arController.canvas)
        }
    }

    arToolkitSource.init(function onReady(){
        onResize()
    });

    // handle resize event
    window.addEventListener('resize', function(){
        onResize()
    });

    ////////////////////////////////////////////////////////////
    // setup arToolkitContext
    ////////////////////////////////////////////////////////////

    // create atToolkitContext
    arToolkitContext = new THREEx.ArToolkitContext({
        cameraParametersUrl: 'data/camera_para.dat',
        detectionMode: 'mono'
    });

    // copy projection matrix to camera when initialization complete
    arToolkitContext.init( function onCompleted(){
        camera.projectionMatrix.copy( arToolkitContext.getProjectionMatrix() );
    });

    ////////////////////////////////////////////////////////////
    // setup markerRoots
    ////////////////////////////////////////////////////////////

    // build markerControls
    markerRoot1 = new THREE.Group();
    scene.add(markerRoot1);
    let markerControls1 = new THREEx.ArMarkerControls(arToolkitContext, markerRoot1, {
        type: 'pattern', patternUrl: "data/hiro.patt",
    })

    let geometry1 = new THREE.SphereGeometry(1, 32,32);

    let loader = new THREE.TextureLoader();
    let texture = loader.load( 'images/earth-sphere.jpg', render );
    let material1 = new THREE.MeshLambertMaterial( { map: texture, opacity: 0.8 } );

    mesh1 = new THREE.Mesh( geometry1, material1 );
    mesh1.position.y = 1;

    markerRoot1.add( mesh1 );

    let pointLight = new THREE.PointLight( 0xffffff, 1, 100 );
    pointLight.position.set(0.5,3,2);
    // create a mesh to help visualize the position of the light
    pointLight.add(
        new THREE.Mesh(
            new THREE.SphereBufferGeometry( 0.05, 16,8 ),
            new THREE.MeshBasicMaterial({ color: 0xffffff, opacity: 0.8 })
        )
    );
    markerRoot1.add( pointLight );
}

function update()
{
    if ( markerRoot1.visible )
        mesh1.rotation.y += 0.01;
    // update artoolkit on every frame
    if ( arToolkitSource.ready !== false )
        arToolkitContext.update( arToolkitSource.domElement );
}

function render()
{
    renderer.render( scene, camera );
}

function animate()
{
    requestAnimationFrame(animate);
    deltaTime = clock.getDelta();
    totalTime += deltaTime;
    update();
    render();
}

</script>

</body>
</html>
Latest Posts
- 3:47 AM: Inside a Real Incident Caught by an Open-Source SOC Stack July 2, 2026
- The EV Driver App You Don’t Have to Build: QR-Code Charging with OCPP ID Tags July 2, 2026
- On-Premise LLM Deployment: Hardware, Models, and TCO for Enterprise (2026) July 1, 2026
- Launch Your EV Charging Network in 6 Steps — No Proprietary Software Required June 29, 2026
- Your Quality Records Are a Fire Hazard June 27, 2026
- Why Your Factory Floor Is the Softest Target in Your Network June 27, 2026