Building a Lightweight EXFO Tester Admin Panel with FastAPI and Alpine.js
In this post, I’ll walk you through how to build a lightweight web application that integrates with EXFO tester APIs, allows for user authentication, and fetches test results using FastAPI and Alpine.js.
Why FastAPI + Alpine.js?
- FastAPI is a modern, async-ready web framework perfect for building APIs and backend systems.
- Alpine.js is a minimal JavaScript framework that allows you to add interactivity without needing a heavy frontend like React or Vue.
- Together, they create a clean, fast, and powerful stack ideal for internal admin panels or embedded control apps.
Key Features
- Session-based login system (username + password)
- Authentication-protected API endpoints
- A single HTML page that dynamically fetches test results after login
- EXFO integration placeholder for real test results
Tech Stack
- Backend: FastAPI
- Frontend: HTML + TailwindCSS + Alpine.js
- Auth: Session-based with cookie storage
- API: Mock EXFO test result endpoint
Basic Fiber Optic Terms
Before diving into EXFO testing, it’s helpful to understand some key fiber optic terms:
- OLT (Optical Line Terminal): The central device at the telecom provider that sends data to multiple ONUs.
- ONU/ONT (Optical Network Unit/Terminal): The device at the user’s location that receives data from the OLT.
- PON (Passive Optical Network): A point-to-multipoint fiber network that uses unpowered splitters.
- GPON/XGS-PON: Standards for PONs offering different speeds (GPON = 2.5 Gbps down; XGS-PON = 10 Gbps symmetrically).
- dBm: Measurement unit for optical signal power.
How to Configure an EXFO PON Tester (Basics)
1.Connect the Tester
- Plug the fiber cable from the splitter or drop cable into the EXFO tester’s "ONT" port.
- Optionally connect the ONU to the tester’s "PON" output port for inline testing.
2.Select PON Mode
- Choose between GPON, XGS-PON, or dual-mode depending on your deployment.
3.Power Measurement
- Start a power test to check downstream (OLT) and upstream (ONT) signal levels.
- Typical acceptable range: –8 dBm to –27 dBm.
4.Pass/Fail Results
- The tester will display whether levels are within thresholds.
- Adjust thresholds manually if needed to match your network standard.
5.Save/Export Results
- Use USB or API integration to export results to your backend or PC.
System Deployment Diagram (Mermaid.js)
graph TD
    A["EXFO Tester"] --> B["FastAPI Server"]
    B --> C["Session Auth API"]
    B --> D["Test Results API"]
    D --> E["MongoDB (optional)"]
    B --> F["Static HTML + Alpine.js"]
    F --> G["User Browser"]
    G -->|login| C
    G -->|view data| D
ONT + EXFO Tester Configuration Flow (Mermaid.js)
graph LR
Start["Start"] --> Splitter["Connect Drop Fiber to EXFO Tester (ONT Port)"]
Splitter --> InlineTest["(Optional) Connect ONU to PON Port for Inline Test"]
InlineTest --> Mode["Select PON Mode: GPON / XGS-PON"]
Mode --> PowerTest["Run Optical Power Test"]
PowerTest --> Result["Check Signal Levels: OLT RX / ONT TX"]
Result --> Decision{"Within Acceptable Range?"}
Decision -- Yes --> Save["Save / Export Result"]
Decision -- No --> Adjust["Adjust Fiber or Ports and Retest"]
Save --> Done["Done"]
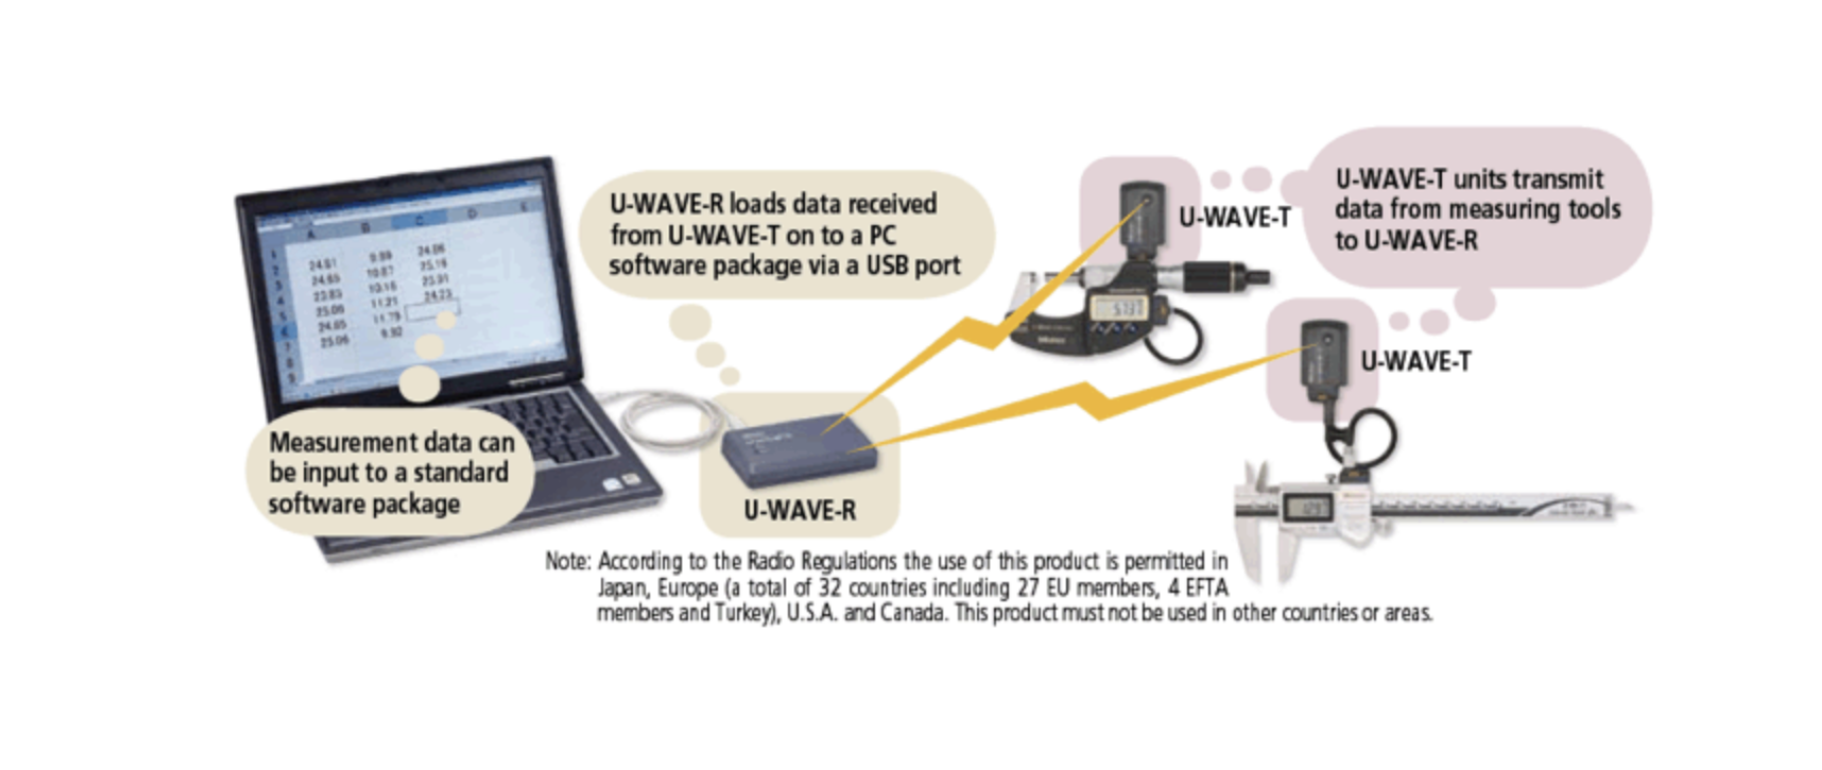
Adjust --> PowerTestEXFO Tester Physical Setup Diagram (Mermaid.js)
graph TD
    A["OLT (Central Office)"] --> B["Splitter"]
    B --> C["Drop Fiber"]
    C --> D["EXFO Tester (ONT Port)"]
    D -->|optional| E["PON Port to ONU"]
    E --> F["User Premises / ONU Device"]
This diagram shows the standard setup for inline testing using an EXFO tester. The drop fiber is connected to the ONT port, and optionally, the ONU can be connected to the PON port so the tester sits inline and does not interrupt service.
graph LR
    Start["Start"] --> Splitter["Connect Drop Fiber to EXFO Tester (ONT Port)"]
    Splitter --> InlineTest["(Optional) Connect ONU to PON Port for Inline Test"]
    InlineTest --> Mode["Select PON Mode: GPON / XGS-PON"]
    Mode --> PowerTest["Run Optical Power Test"]
    PowerTest --> Result["Check Signal Levels: OLT RX / ONT TX"]
    Result --> Decision{"Within Acceptable Range?"}
    Decision -- Yes --> Save["Save / Export Result"]
    Decision -- No --> Adjust["Adjust Fiber or Ports and Retest"]
    Save --> Done["Done"]
    Adjust --> PowerTest
graph TD
A["EXFO Tester"] --> B["FastAPI Server"]
B --> C["Session Auth API"]
B --> D["Test Results API"]
D --> E["MongoDB (optional)"]
B --> F["Static HTML + Alpine.js"]
F --> G["User Browser"]
G -->|login| C
G -->|view data| D1. Project Setup
Install dependencies:
pip install fastapi uvicorn python-multipart jinja2Directory structure:
project/
├── main.py
└── templates/
    └── index.html
2. FastAPI Backend Code (main.py)
from fastapi import FastAPI, Request, Form
from fastapi.responses import RedirectResponse, JSONResponse
from fastapi.templating import Jinja2Templates
from starlette.middleware.sessions import SessionMiddleware

app = FastAPI()
app.add_middleware(SessionMiddleware, secret_key="supersecret")
templates = Jinja2Templates(directory="templates")

users = {"admin": {"password": "1234"}}
fake_data = [
    {"id": 1, "onu": "ONU123", "status": "PASS"},
    {"id": 2, "onu": "ONU456", "status": "FAIL"},
]

def get_current_user(request: Request):
    return request.session.get("user")

@app.get("/")
def index(request: Request):
    user = get_current_user(request)
    return templates.TemplateResponse("index.html", {"request": request, "user": user})

@app.post("/login")
def login(request: Request, username: str = Form(...), password: str = Form(...)):
    if username in users and users[username]["password"] == password:
        request.session["user"] = username
        return RedirectResponse("/", status_code=303)
    return RedirectResponse("/?error=1", status_code=303)

@app.get("/logout")
def logout(request: Request):
    request.session.clear()
    return RedirectResponse("/", status_code=303)

@app.get("/api/test-results")
def get_test_data(request: Request):
    if not get_current_user(request):
        return JSONResponse(status_code=401, content={"detail": "Unauthorized"})
    return fake_data
3. HTML + Alpine.js Frontend (templates/index.html)
<!DOCTYPE html>
<html lang="en" x-data="testApp()" x-init="init()">
<head>
  <script src="https://cdn.jsdelivr.net/npm/alpinejs" defer></script>
  <link href="https://cdn.jsdelivr.net/npm/tailwindcss@2.2.19/dist/tailwind.min.css" rel="stylesheet">
  <title>EXFO Admin Panel</title>
</head>
<body class="p-6 bg-gray-100">
  <div class="max-w-xl mx-auto bg-white p-6 rounded shadow text-center">

    <template x-if="!loggedIn">
      <form method="POST" action="/login" class="space-y-4">
        <h2 class="text-xl font-bold">Login</h2>
        <input type="text" name="username" placeholder="Username" class="border p-2 w-full">
        <input type="password" name="password" placeholder="Password" class="border p-2 w-full">
        <button type="submit" class="bg-blue-600 text-white px-4 py-2 rounded">Login</button>
      </form>
    </template>

    <template x-if="loggedIn">
      <div>
        <h2 class="text-xl font-bold mb-4">Test Results</h2>
        <a href="/logout" class="text-sm text-blue-600 underline">Logout</a>
        <ul class="mt-4 space-y-2 text-left">
          <template x-for="item in testResults" :key="item.id">
            <li class="p-2 border rounded">
              <strong x-text="item.onu"></strong> - <span x-text="item.status"></span>
            </li>
          </template>
        </ul>
      </div>
    </template>
  </div>

  <script>
    function testApp() {
      return {
        loggedIn: {{ 'true' if user else 'false' }},
        testResults: [],
        async init() {
          if (this.loggedIn) {
            try {
              const res = await fetch('/api/test-results');
              if (res.ok) {
                this.testResults = await res.json();
              }
            } catch (err) {
              console.error("Error fetching test results", err);
            }
          }
        }
      }
    }
  </script>
</body>
</html>
4. Run It
uvicorn main:app --reloadVisit http://localhost:8000 and log in with:
- Username:
admin - Password:
1234
Conclusion
This is a great starting point for building an EXFO-integrated dashboard with:
- Lightweight UI using Tailwind + Alpine.js
- FastAPI backend with full async support
- Session-based login
- API-protected data views
You can expand this to include:
- MongoDB support
- Real EXFO tester API calls
- Role-based access control
- Export to CSV/PDF
Need help upgrading it? Drop a comment!
Get in Touch with us

Chat with Us on LINE
iiitum1984
Related Posts
- 中国品牌出海东南亚:支付、物流与ERP全链路集成技术方案
- 再生资源工厂管理系统:中国回收企业如何在不知不觉中蒙受损失
- 如何将电商平台与ERP系统打通:实战指南(2026年版)
- AI 编程助手到底在用哪些工具?(Claude Code、Codex CLI、Aider 深度解析)
- 使用 Wazuh + 开源工具构建轻量级 SOC:实战指南(2026年版)
- 能源管理软件的ROI:企业电费真的能降低15–40%吗?
- The ROI of Smart Energy: How Software Is Cutting Costs for Forward-Thinking Businesses
- How to Build a Lightweight SOC Using Wazuh + Open Source
- How to Connect Your Ecommerce Store to Your ERP: A Practical Guide (2026)
- What Tools Do AI Coding Assistants Actually Use? (Claude Code, Codex CLI, Aider)
- How to Improve Fuel Economy: The Physics of High Load, Low RPM Driving
- 泰国榴莲仓储管理系统 — 批次追溯、冷链监控、GMP合规、ERP对接一体化
- Durian & Fruit Depot Management Software — WMS, ERP Integration & Export Automation
- 现代榴莲集散中心:告别手写账本,用系统掌控你的生意
- The Modern Durian Depot: Stop Counting Stock on Paper. Start Running a Real Business.
- AI System Reverse Engineering:用 AI 理解企业遗留软件系统(架构、代码与数据)
- AI System Reverse Engineering: How AI Can Understand Legacy Software Systems (Architecture, Code, and Data)
- 人类的优势:AI无法替代的软件开发服务
- The Human Edge: Software Dev Services AI Cannot Replace
- From Zero to OCPP: Launching a White-Label EV Charging Platform